


React Native, a popular JavaScript-based UI software framework that allows you to build natively rendering mobile apps both in Android and iOS. This framework lets you create an application for various platforms by using the same codebase.
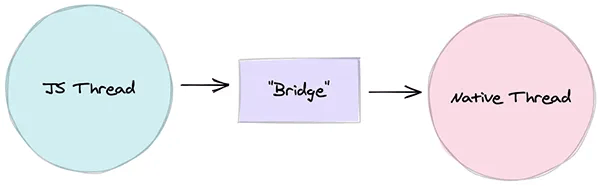
What is so special about React Native is that we can write our application code in JavaScript and the JS engine runs our JavaScript code on its own thread and then communicates to the native thread via a bridge. Here is a simple diagram to help up think about this:
 Generally, this works well! We don't have to remember that there is a bridge, we just write JavaScript and create awesome applications. But there are certain aspects of an application where the user is going to notice when performance is taking a hit. One of those aspects is animation. Luckily, React native comes with its own animation tool that can create some smooth animation.
React native's animated API helps you declare animation in JS, and then push your animation declarations to the native UI thread for execution. However, there are certain limitations to what you can do with React native animated API. In a real-world application, we would have a tool that allows you to create an animation that's, run primarily on the native UI thread and allow us to forget about the bridge.
PermalinkIntro of React native reanimated2:
React native reanimated is a library that helps us to build smooth animations and handle gesture events. It replaces React native animated API and provides JS animation APIs that are easy to use and run on the native thread.
PermalinkShared Value:
A fundamental concept that lies behind the Reanimated 2.0 is the shared Value. It is essentially a primitive value on the JS side but can be used to drive animations on the UI side. We can update shared values on the JS side and see these changes are reflected on the UI thread.
Let's look at a simple example for shared value,
import React from 'react';
import {Button} from 'react-native';
import { useSharedValue } from 'react-native-reanimated';
function App() {
const sharedValue = useSharedValue(0);
return (
<Button
onPress={() => sharedValue.value += 1}
title="Press to count..."
/>
);
};
In the above example, If we hit the button the shared value gets incremented!
PermalinkAnimated styles:
When we think of animation, we generally animate various styles. Reanimated gives us a useAnimatedStyle hook that allows us to animate styles using shared values. Let's look at an example,
import React from 'react';
import {Button,View} from 'react-native';
import Animated, { useSharedValue, useAnimatedStyle } from 'react-native-reanimated';
function App() {
const sharedValue = useSharedValue(0);
const boxStyle = useAnimatedStyle(() => {
return {
width: 100,
height: 100,
backgroundColor: 'red',
// Animate translateX
transform: [{ translateX: x.value }],
}
});
return (
<View>
<Button title="Increment x" onPress={() => sharedValue.value += 1} />
<Animated.View style={boxStyle} />
</View>
);
};
In the above example, we use useAnimatedStyle to create a style that is dynamic based on our shared value. We pass that animated style to Animated.View, and as we press our button, the little square will move across the screen.
PermalinkLet's demonstrate animation using RN reanimated 2.0, with some examples:
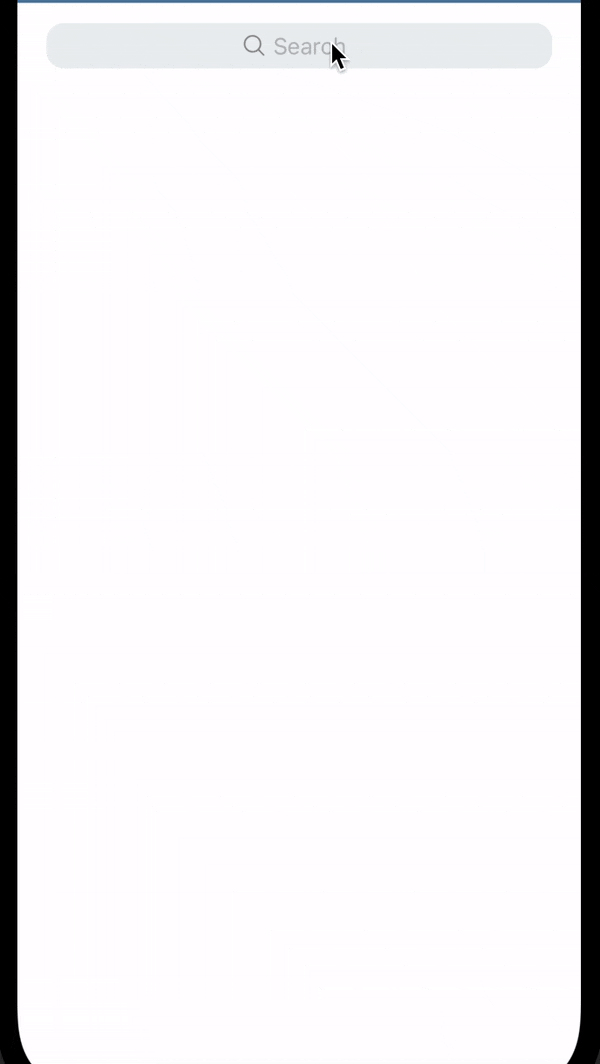
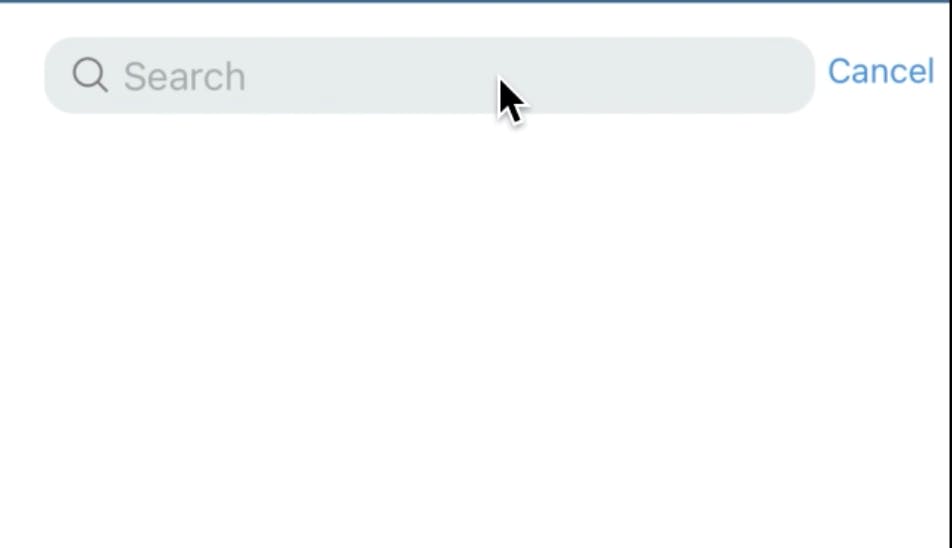
let's develop a search input box, which will shrink during input field focus and it expands when we press outside anywhere in the screen. The final output would look like this,
 You can create a new react-native project by running these commands in the terminal,
npx react-native init AwesomeProject
Please follow the instructions in the React native Reanimate2.0 official documentation for installation in your project. React native reanimated installation
I hope you guys have successfully configured a reanimated library in your project. Let's start designing the input box and cancel button,
import React from 'react';
import {
StyleSheet,
Text,
TextInput,
TouchableOpacity,
View,
} from 'react-native';
import Icon from 'react-native-vector-icons/Ionicons';
const CustomTextInput = () => {
return (
<View style={styles.searchTopContainer}>
<View style={styles.searchContainer}>
<View style={styles.search}>
<Icon name="search-outline" size={18} style={styles.searchIcon} />
{/* TextInput */}
<TextInput
placeholder={'Search'}
style={{fontSize: 16, paddingRight: 20}}
/>
</View>
</View>
{/* Cancel button */}
<View style={styles.cancelBtnContainer}>
<TouchableOpacity onPress={() => {}}>
<Text>Cancel</Text>
</TouchableOpacity>
</View>
</View>
);
};
export default CustomTextInput;
const styles = StyleSheet.create({
searchTopContainer: {
flexDirection: 'row',
alignItems: 'center',
backgroundColor: '#ecf0f1',
},
searchContainer: {
paddingVertical: 6,
paddingHorizontal: 10,
marginTop: 14,
borderRadius: 12,
},
search: {
flexDirection: 'row',
},
searchIcon: {
marginRight: 4,
},
cancelBtnContainer: {
marginLeft: 5,
marginTop: 10,
},
});
The final design should look like this,
 Let's declare the shared value for Input box length, Search Text placement and Cancel button appearance. Import the useSharedValue hook from the RN reanimated library, and declare the values.
import { useSharedValue } from 'react-native-reanimated';
...
const CustomTextInput = () => {

  const InputLength = useSharedValue({width: '100%'});

  const SearchTextPlacement = useSharedValue({
    transformX: (Dimensions.get('window').width - 140) / 2,
  });

  const CancelBtn = useSharedValue({transformX: 100});
 .....
Then, define the Animated styles for the Input box, Search Text placement, and the Cancel button. Import the useAnimatedStyle hook from the RN reanimated library, and define the functions.
import { useAnimatedStyle, useSharedValue, withTiming } from 'react-native-reanimated';
...
const InputLengthStyles = useAnimatedStyle(() =>
    return {
      width: withTiming(InputLength.value.width, {
        duration: 250,
      }),
    };
  });

  const SearchTextPlacementStyles = useAnimatedStyle(() => {
    return {
      transform: [
        {
          translateX: withTiming(SearchTextPlacement.value.transformX, {
            duration: 250,
          }),
        },
      ],
    };
  });

  const CancelBtnStyles = useAnimatedStyle(() => {
    return {
      transform: [
        {translateX: withTiming(CancelBtn.value.transformX, {duration: 250})},
      ],
    };
  });
...
Here we are using withTiming callback function to start the time based on the animation. The withTiming needs two arguments, one is toValue and the second one is the object contains duration and easing.
In InputLengthStyles function, we are updating(animating) width property, which is not possible in React native animated API nowadays 😂😂
Let's add the defined animated styles into our JSX components,
import Animated, { useAnimatedStyle, useSharedValue, withTiming} from 'react-native-reanimated';
...
return (
<View style={styles.searchTopContainer}>
{/* Added InputLengthStyles animated styles */}
<Animated.View style={[styles.searchContainer, InputLengthStyles]}>
{/* Added SearchTextPlacementStyles animated styles */}
<Animated.View style={[styles.search, SearchTextPlacementStyles]}>
<Icon name="search-outline" size={18} style={styles.searchIcon} />
{/* TextInput */}
<TextInput
placeholder={'Search'}
style={{fontSize: 16, paddingRight: 20}}
/>
</Animated.View>
</Animated.View>
{/* Cancel button */}
{/* Added CancelBtnStyles animated styles */}
<Animated.View style={[styles.cancelBtnContainer, CancelBtnStyles]}>
<TouchableOpacity onPress={() => {}}>
<Text>Cancel</Text>
</TouchableOpacity>
</Animated.View>
</View>
);
};
...
Finally trigger the animation during focusing(touching) the text input and reset the animated values when clicking the cancel button.
import React, {useRef} from 'react';
...
const inputRef = useRef<any>(null);
...
const onFocus = ()=>{
InputLength.value = {width: '90%'};
SearchTextPlacement.value = {transformX: 0};
CancelBtn.value = {transformX: 0};
}
const onCancelAnimation = () => {
InputLength.value = {width: '100%'};
SearchTextPlacement.value = {
transformX: (Dimensions.get('window').width - 140) / 2,
};
CancelBtn.value = {transformX: 100};
inputRef.current.blur();
};
...
<TextInput
placeholder={'Search'}
style={{fontSize: 16, paddingRight: 20}}
onFocus={onFocus}
ref={inputRef}
/>
...
<Animated.View style={[styles.cancelBtnContainer, CancelBtnStyles]}>
<TouchableOpacity onPress={onCancelAnimation}>
<Text>Cancel</Text>
</TouchableOpacity>
</Animated.View>
...
The final code would look this,
import React, {useRef} from 'react';
import {
Dimensions,
StyleSheet,
Text,
TextInput,
TouchableOpacity,
View,
} from 'react-native';
import Animated, {
useAnimatedStyle,
useSharedValue,
withTiming,
} from 'react-native-reanimated';
import Icon from 'react-native-vector-icons/Ionicons';
const CustomTextInput = () => {
const InputLength = useSharedValue({width: '100%'});
const inputRef = useRef<any>(null);
const SearchTextPlacement = useSharedValue({
transformX: (Dimensions.get('window').width - 140) / 2,
});
const CancelBtn = useSharedValue({transformX: 100});
const InputLengthStyles = useAnimatedStyle(() => {
return {
width: withTiming(InputLength.value.width, {
duration: 250,
}),
};
});
const SearchTextPlacementStyles = useAnimatedStyle(() => {
return {
transform: [
{
translateX: withTiming(SearchTextPlacement.value.transformX, {
duration: 250,
}),
},
],
};
});
const CancelBtnStyles = useAnimatedStyle(() => {
return {
transform: [
{translateX: withTiming(CancelBtn.value.transformX, {duration: 250})},
],
};
});
const onFocus = () => {
InputLength.value = {width: '90%'};
SearchTextPlacement.value = {transformX: 0};
CancelBtn.value = {transformX: 0};
};
const onCancelAnimation = () => {
InputLength.value = {width: '100%'};
SearchTextPlacement.value = {
transformX: (Dimensions.get('window').width - 140) / 2,
};
CancelBtn.value = {transformX: 100};
inputRef.current.blur();
};
return (
<View style={styles.searchTopContainer}>
{/* Added InputLengthStyles animated styles */}
<Animated.View style={[styles.searchContainer, InputLengthStyles]}>
{/* Added SearchTextPlacementStyles animated styles */}
<Animated.View style={[styles.search, SearchTextPlacementStyles]}>
<Icon name="search-outline" size={18} style={styles.searchIcon} />
{/* TextInput */}
<TextInput
placeholder={'Search'}
style={{fontSize: 16, paddingRight: 20}}
onFocus={onFocus}
ref={inputRef}
/>
</Animated.View>
</Animated.View>
{/* Cancel button */}
{/* Added CancelBtnStyles animated styles */}
<Animated.View style={[styles.cancelBtnContainer, CancelBtnStyles]}>
<TouchableOpacity onPress={onCancelAnimation}>
<Text>Cancel</Text>
</TouchableOpacity>
</Animated.View>
</View>
);
};
export default CustomTextInput;
const styles = StyleSheet.create({
searchTopContainer: {
flexDirection: 'row',
alignItems: 'center',
backgroundColor: '#ecf0f1',
},
searchContainer: {
paddingVertical: 6,
paddingHorizontal: 10,
marginTop: 14,
borderRadius: 12,
},
search: {
flexDirection: 'row',
},
searchIcon: {
marginRight: 4,
},
cancelBtnContainer: {
marginLeft: 5,
marginTop: 10,
},
});
PS: Here is the git gist link for full source code ✌️✌️
I hope you successfully implemented the search box input animation by using this article. And I hope this article will help you to understand the React native reanimated library and how to use it in your project 😊😊 Please share your comments, if you know any other libraries for React native animation other than React native animated API and Reanimated.
And If you like this article please share it with your friends ✌️✌️
Thanks for reading! Be safe at home!
Happy coding!